Ekman's transport lab
Materials:
-Two pencils
-Paperboard Arrows
-Paper marked with angles
-Ruler
The Point:
Using the data from Nansen's journey, Ekman developed a theory to explain why icebergs did not move in the same direction as the wind. He then explained this theory to predict what was happening to water below the surface. This lab will illustrate what Ekman did, and show how winds move water below the surface.
Procedure:
1. Imagine our pencil is 100m long. Hold it vertically with the point in the center of the "angle wheel." This represents the top 100m of the ocean (the eraser end of the pencil is the surface of the water).
2. Find the long arrow labeled "Wind." The length of the arrow represents the strength of the force of the wind (longer means more force).
3. Carefully thread the "Wind" arrow onto the pencil creating a hole near the back of the arrow.
4. Replace the pencil on the center of the "angle wheel" and orient the wind arrow toward the north. (So it doesn't flop over, you can gently crimp the paper the long way).
~ The wind is blowing from the South to the North.
5. Find the arrow labeled "Surface." This arrow represents the magnitude and direction of water flow on the surfaced caused by the wind. Carefully thread this arrow on to the pencil (below the wind arrow). Replace the pencil in the center of the angle wheel.
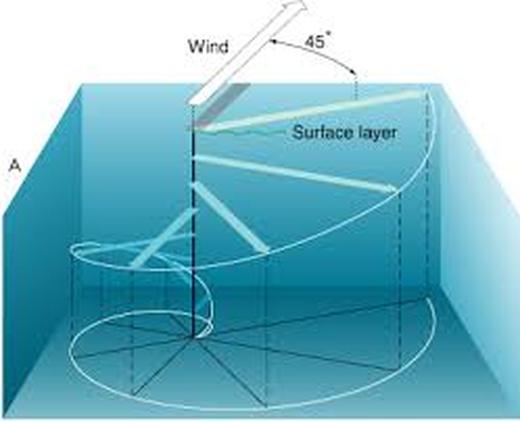
6. Nansen observed that icebergs drift at an angle roughly 45 degrees to the right of the wind (in the northern hemisphere). Position this arrow at 45 degrees.
7. Find the arrow labeled "20 meters."This arrow represents the magnitude and direction of water flow at 20 meters depth. Carefully thread this arrow on to the pencil (below the "surface" arrow, and roughly 1/5" of the way down the pencil). Replace the pencil in the center of the angle wheel. But which direction does this arrow point?
Ekman's Breakthrough:
Help Ekman decide what direction the "20 meter" water moves by answering the following questions for water moving in the northern hemisphere:
a) In the northern hemisphere, the Coriolis force deflects objects to the right.
b) Wind is the force pushing the surface water, so the surface water starts to move in this direction, but is deflected to the right of the wind due to Coriolis.
c)WHat pushes on the water at 20 meters depth?
~ Water above 20 meters.
d) If the surface water moves at an angle to the right of the wind (in the northern hemisphere), what do you think will happen ti the water at 20 meters depth?
~ It would move to the right of the surface water.
8. Adjust the angle of the arrow labeled "20 meters" so that it agrees with your answers above. Use an angle of 45 degrees.
9. Repeat step 7 and 8 for the water at 40 meters, 60 meters, 80 meters, and 100 meters.
10. Place your pencil on the center of the "angle wheel" and look at it form above. What shape do the arrows look like from above? Try to draw it.
~ It looks like a spiral.
-Two pencils
-Paperboard Arrows
-Paper marked with angles
-Ruler
The Point:
Using the data from Nansen's journey, Ekman developed a theory to explain why icebergs did not move in the same direction as the wind. He then explained this theory to predict what was happening to water below the surface. This lab will illustrate what Ekman did, and show how winds move water below the surface.
Procedure:
1. Imagine our pencil is 100m long. Hold it vertically with the point in the center of the "angle wheel." This represents the top 100m of the ocean (the eraser end of the pencil is the surface of the water).
2. Find the long arrow labeled "Wind." The length of the arrow represents the strength of the force of the wind (longer means more force).
3. Carefully thread the "Wind" arrow onto the pencil creating a hole near the back of the arrow.
4. Replace the pencil on the center of the "angle wheel" and orient the wind arrow toward the north. (So it doesn't flop over, you can gently crimp the paper the long way).
~ The wind is blowing from the South to the North.
5. Find the arrow labeled "Surface." This arrow represents the magnitude and direction of water flow on the surfaced caused by the wind. Carefully thread this arrow on to the pencil (below the wind arrow). Replace the pencil in the center of the angle wheel.
6. Nansen observed that icebergs drift at an angle roughly 45 degrees to the right of the wind (in the northern hemisphere). Position this arrow at 45 degrees.
7. Find the arrow labeled "20 meters."This arrow represents the magnitude and direction of water flow at 20 meters depth. Carefully thread this arrow on to the pencil (below the "surface" arrow, and roughly 1/5" of the way down the pencil). Replace the pencil in the center of the angle wheel. But which direction does this arrow point?
Ekman's Breakthrough:
Help Ekman decide what direction the "20 meter" water moves by answering the following questions for water moving in the northern hemisphere:
a) In the northern hemisphere, the Coriolis force deflects objects to the right.
b) Wind is the force pushing the surface water, so the surface water starts to move in this direction, but is deflected to the right of the wind due to Coriolis.
c)WHat pushes on the water at 20 meters depth?
~ Water above 20 meters.
d) If the surface water moves at an angle to the right of the wind (in the northern hemisphere), what do you think will happen ti the water at 20 meters depth?
~ It would move to the right of the surface water.
8. Adjust the angle of the arrow labeled "20 meters" so that it agrees with your answers above. Use an angle of 45 degrees.
9. Repeat step 7 and 8 for the water at 40 meters, 60 meters, 80 meters, and 100 meters.
10. Place your pencil on the center of the "angle wheel" and look at it form above. What shape do the arrows look like from above? Try to draw it.
~ It looks like a spiral.
11. People frequently wonder what happens to the "net" or average wind-driven transport. This is simply the "vector sum" of all your arrows. Tod add the contribution from each layer, do the following.
a) With your pencil in the center of the wheel, take the lowest arrow (100 meter layer) of the pencil and lay it on the wheel being careful not to change the angle.
b) Move the tip of your pencil to the tip of the arrow you just removed.
c) Remove the next layer (80 meter layer) and lay the arrow on the wheel being careful not to change the angle.
d) Move the tip of your pencil to the tip of 80 meter arrow and repeat the process of removing a layer and moving the pencil for the remaining water layers (Do not remove the "Wind" arrow).
e) After all water layers have been removed, draw a straight arrow on the angle wheel from the center of the circle to the tip of the surface arrow. This arrow represents the direction of the entire wind-driven ocean layer.
f) Compare the arrow you just drew to the wind arrow.
~ The average water motion is at an angle 45 degrees to the right of the wind.
